Showing posts with label my kitchen. Show all posts

Tuesday, April 09, 2024

my kitchen: EASY HOMEMADE BISCUITS


Easy Homemade Biscuits

Makes 6-8 

Thank you Sugar Spun Run for the recipe! 


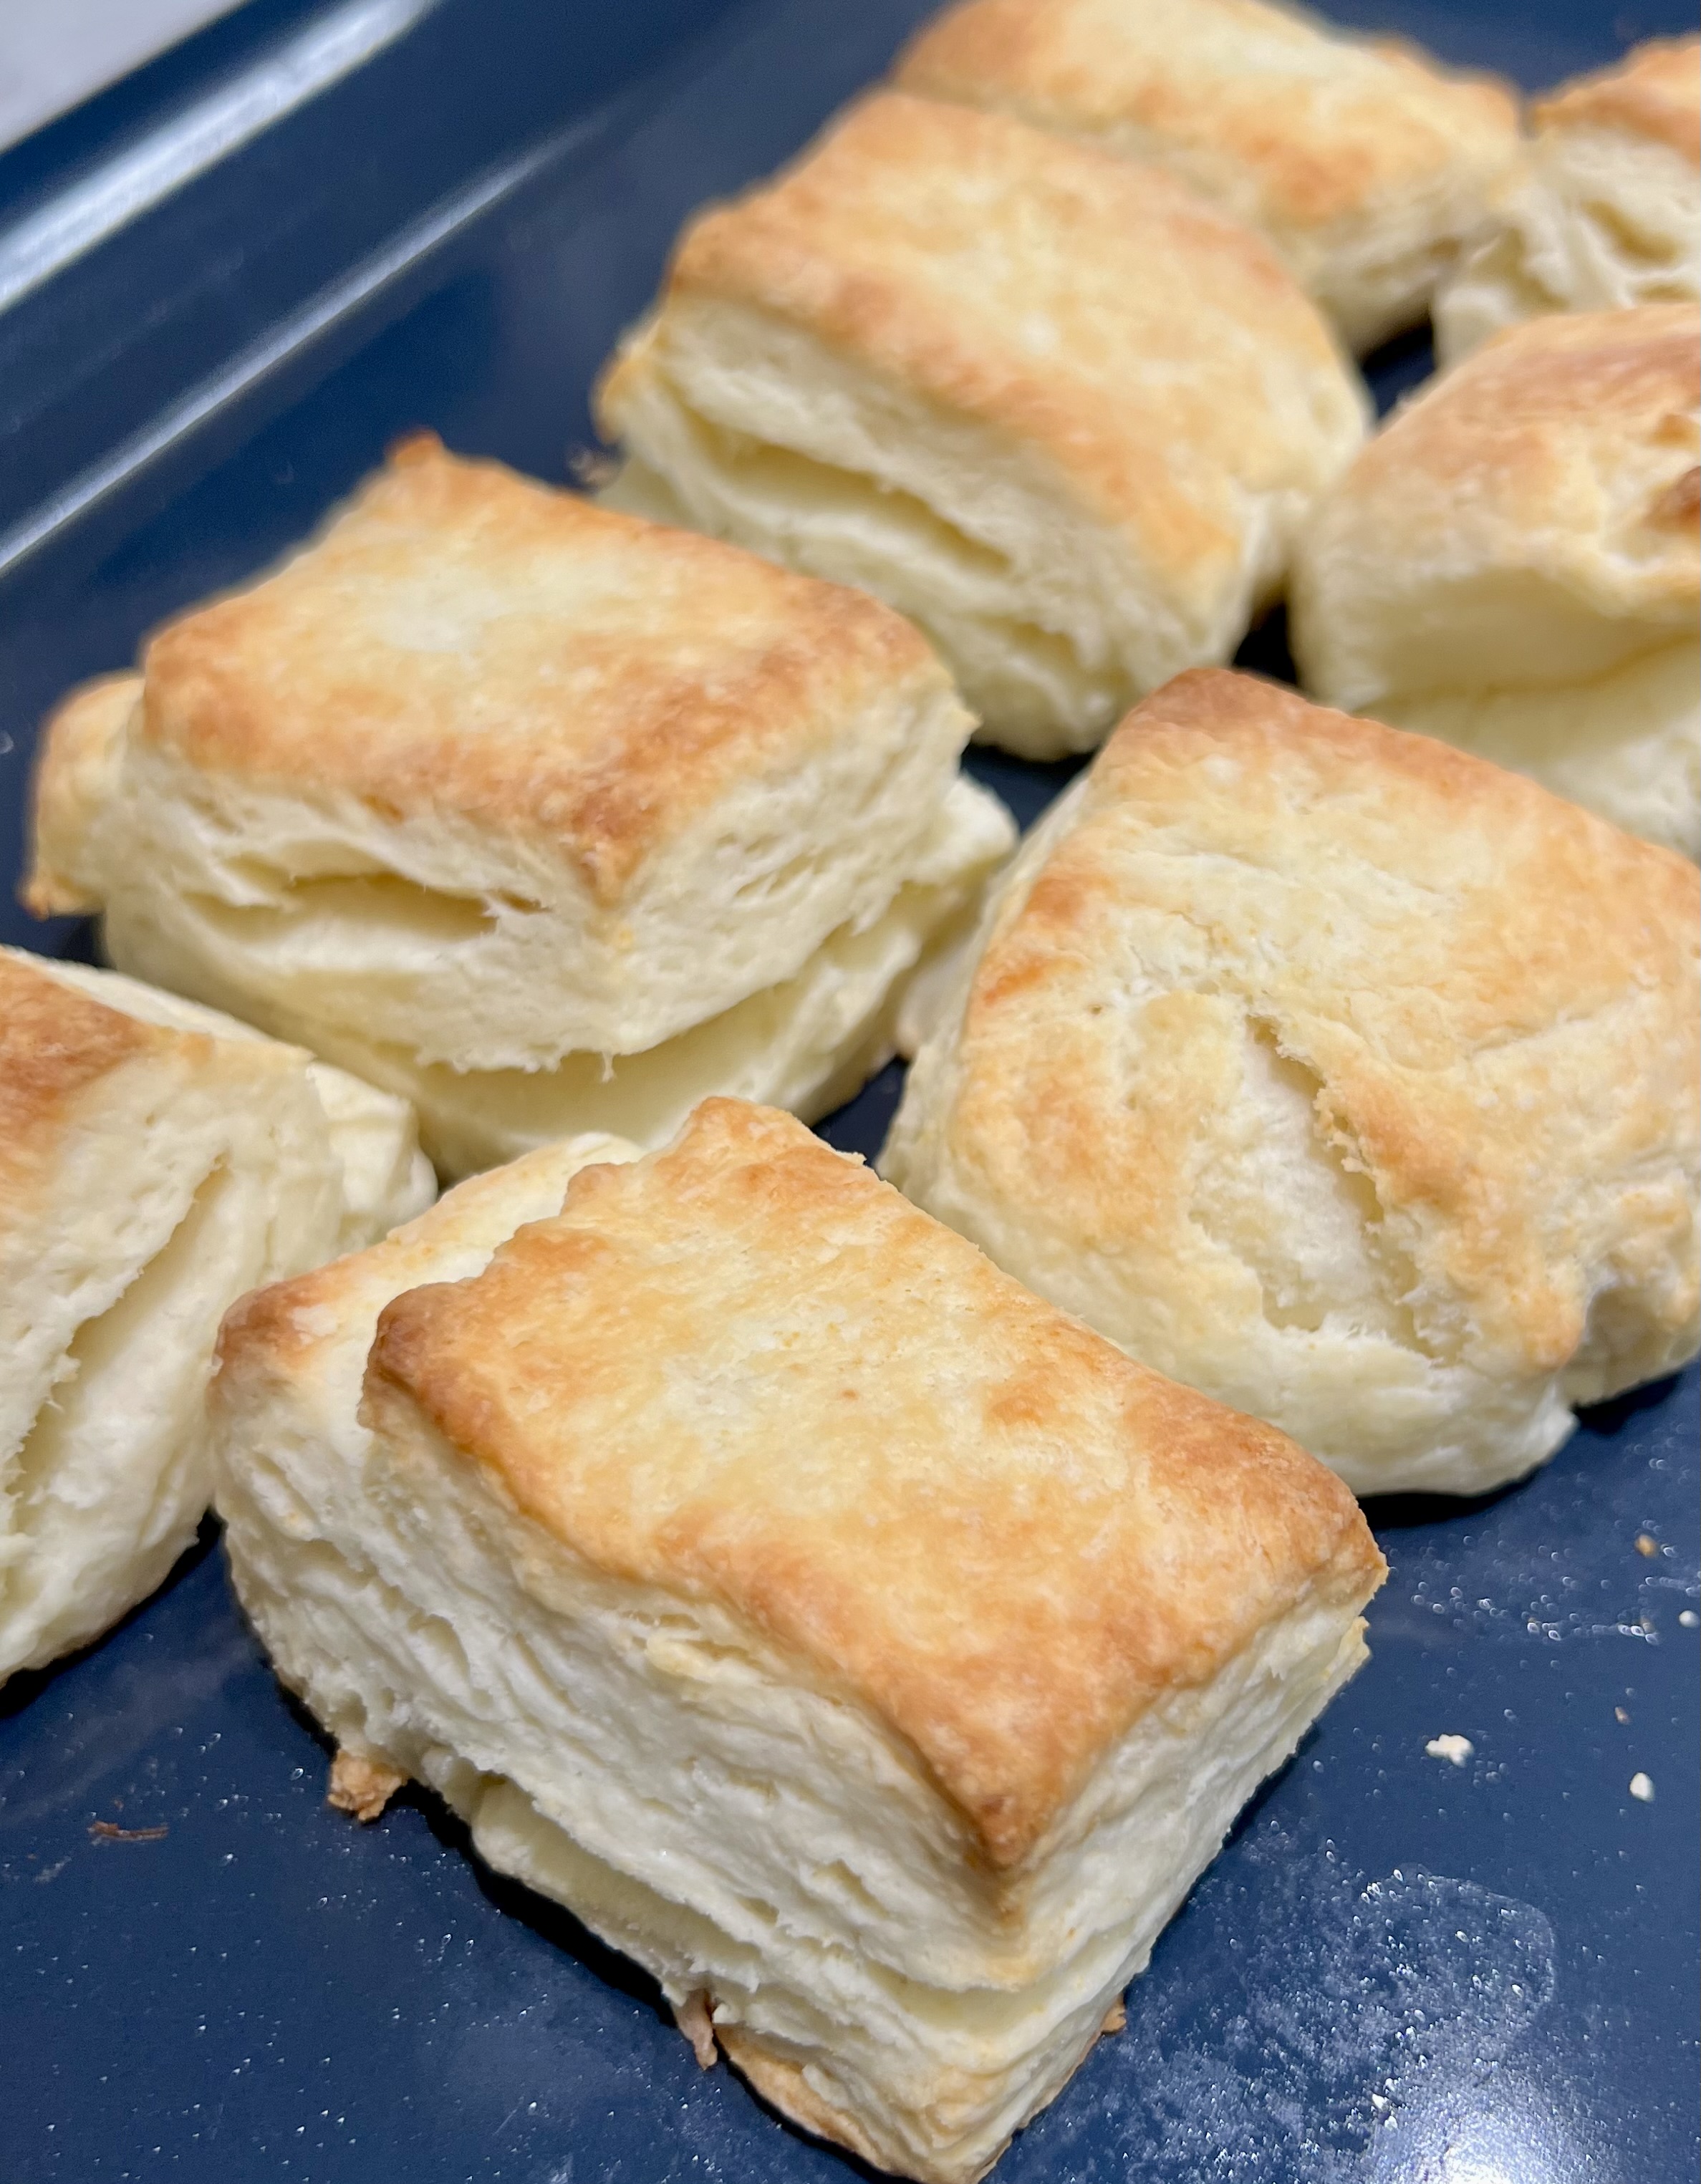
These biscuits were light and fluffy, yet had a nice crunchy top. Make sure to fold the dough over itself for the nice flaky layers. So good out of the oven, with a bit of honey and butter. Finished this batch the same day, next time I would double it for a dozen. This recipe is a keeper. 


Ingredients

  • 2 cups all-purpose flour (250g)
  • 1 Tablespoon baking powder
  • 1 Tablespoon granulated sugar
  • 1 teaspoon salt
  • 6 Tablespoons butter very cold, chopped or grated 
  • 1/4 cup Greek yogurt *
  • 1/2 cup whole milk *

Original recipe: uses unsalted butter and  ¾ cup whole milk or buttermilk 

Instructions

  • For best results, chill your butter in the freezer for 10-20 minutes before beginning this recipe. It's ideal that the butter is very cold for light, flaky, buttery biscuits. (I had butter already in the freezer so I took it out while I was prepping the dry ingredients)
  • Preheat oven to 220C/ 425F and prep a cookie sheet
  • Combine flour, baking powder, sugar, and salt in a large bowl and mix well. 
  • Cut or grate butter with box grater and mix it into your flour mixture. Can also use fingers to press butter into flour. Combine until it looks like coarse crumbs.
  • Add yogurt, milk, and stir until just combined (don't over-work the dough).
  • Transfer your biscuit dough to a well-floured surface and use your hands to gently work the dough together. If the dough is too sticky, add flour until it is manageable. 
  • Once the dough comes together, fold in half over itself and use your hands to gently flatten layers together. Rotate the dough 90 degrees and fold in half again, repeating this step 5-6 times but taking care to not overwork the dough.
  • Use your hands (do not use a rolling pin) to flatten the dough to 1" thick. You can use a round biscuit cutter or I just shaped the dough into a rectangle and cut into 6-8 pieces for a more rustic look  
  • Place less than ½" apart on baking sheet. 
  • Bake on 220C/ 425F for 12 minutes or until tops are beginning to just turn lightly golden brown.
  • If desired, brush with melted salted butter immediately after removing from oven. Serve warm and enjoy.

Thursday, February 29, 2024

my kitchen: EASY LEMON CAKE LOAF

Easy Lemon Cake Loaf


Makes 1 loaf

Thank you Broma Bakery for the recipe! 


Happy leap year! February 29th!

Last night, I was craving cake. And I had all the ingredients in the fridge, mostly. So it was the perfect time to try to make a lemon loaf for the first time.  This recipe from Broma Bakery was very easy to prepare and make, and I skipped the glaze because 1- the cake was sweet enough on it's own for me and 2- I didn't have any powdered sugar on hand. 

This recipe was SO GOOD. We ate almost the entire loaf the first day, though it came out flatter than I expected (maybe because it needed that extra 1/4 cup of flour and 1/4 cup of sugar. lol). (Can you see how moist it is?) 


EASY LEMON CAKE LOAF

INGREDIENTS

  • 3/4 cup granulated sugar*
  • zest of 2 lemons (about 2 Tablespoons)
  • 1/2 cup unsalted butter, melted
  • 2 eggs, room temperature
  • 1 teaspoon vanilla extract
  • 2 Tablespoons lemon juice (about half a lemon)
  • 1/4 cup greek yogurt or sour cream **
  • 1/4 cup milk
  • 1 1/3 cups all purpose flour ***
  • 1/2 teaspoon salt
  • 2 teaspoons baking powder


INSTRUCTIONS

    1. 1. Preheat the oven to 175 C / 350°F 
    2. 2. In a large bowl, combine the granulated sugar and lemon zest. Use your fingers to rub the sugar and the lemon zest together. 
    3. 3. Add the melted butter to the sugar and mix well. Add the vanilla extract and each egg, mixing well. 
    4. 4. Add the greek yogurt, milk and lemon juice. Mix to combine. It will look curdled and lumpy, and that's normal. 
    5. 5. Add the all purpose flour, baking powder, and salt. Mix until the batter is smooth. Do not over mix.
    6. 6. Pour the batter into lined loaf pan and bake at 175 C/ 350°F for 50 minutes to 1 hour, or until a chopstick inserted into the middle comes out mostly clean. Cool slightly before cutting, but it's quite wonderful warm as well. 

* (originally 1 cup)
 ** (originally sour cream)
*** (I misread the recipe and used 1 1/3 cup of flour instead of 1 2/3 cup but the cake came out wonderfully moist and rich but not too dense. will try it next time with the right amount of flour to compare.)

Tuesday, January 23, 2024

my kitchen: EASIEST CHOCOLATE CHIP COOKIE RECIPE

Easiest Chocolate Chip Cookies


Makes 12-24

Credit to I heart eating blog 


Happy new year everyone! 

I’m always trying to find the perfect chocolate chip cookie recipe (and oatmeal chocolate chip) that’s not a fussy recipe and is tasty. I scribble recipes into a notebook and try mark notes afterwards what I thought of the result. This one had a bunch of hearts from last time and it may be my cutest batch yet, so it’s a keeper. The cookie didn’t seem to flatten much with softened (not melted) butter during baking, but were easy to take off the pan after short cooling. The taste is soft but still slightly chewy and crispy on the edges. 

EASIEST CHOCOLATE CHIP COOKIE RECIPE 

INGREDIENTS
  • 1/2 cup butter
  • 1/2 cup granulated sugar
  • 1/4 cup brown sugar packed
  • 2 teaspoons vanilla extract
  • 1 large egg
  • 1 ¾ cups all-purpose flour
  • 1/2 teaspoon baking soda
  • 1/2 teaspoon kosher salt
  • 1 cup semisweet chocolate chips
  • My Optional add in - 1/4 cup oatmeal for 1/4 of the flour 

  • 1.  Preheat the oven to 190 C / 350 F
  • 2. Microwave the butter for about 40 seconds. Butter should be completely melted but shouldn't be hot. (I had some butter that left at room temperature for another batch, so I used that today) 
  • 3. Mix butter with the sugars until well-combined.
  • 4. Stir in vanilla and egg until incorporated.
  • 5. Add the flour, baking soda, and salt. (Spoon in flour rather than packing it in)
  • 6. Mix dough until just combined. Dough should be soft and a little sticky but not overly sticky. (Do not over mix) 
  • 7. Stir in chocolate chips. (And oatmeal. Add chocolate chips on top of scooped dough if needed) 
  • 8. Bake for 7-10 minutes, or until cookies are golden brown on edges and bottom. 9. Sprinkle sea salt or salt flakes on top. 


Thursday, October 19, 2023

my kitchen: ONE BOWL BANANA BREAD WITH YOGURT

One Bowl Banana Bread with Yogurt


Makes 1-2 loaves


Another day, another banana bread recipe. Today’s hit recipewas from Sally’s baking addiction -My Favorite Banana Bread with 4.8 stars and 1200 plus votes. I picked it because I wanted something more moist and had some yogurt on hand (and a lot of browned bananas) and the recipe was a hit! It’s moist, not too dense, nice crust and I added chocolate chips and (and nuts to half of it) and used a square cake pan instead of a loaf pan which reduces the baking time by 20-30 min. 

Ingredients

  • 2 cups all-purpose flour (leveled)
  • 1 teaspoon baking soda
  • 1/4 teaspoon salt
  • 1/2 teaspoon ground cinnamon
  • 1/2 cup (or 1 stick) unsalted butter, room temperature 
  • 3/4 cup packed brown sugar
  • 2 large eggs, room temperature
  • 1/3 cup plain yogurt or sour cream, room temperature
  • 2 cups 
  • mashed bananas (about 4 large ripe bananas)
  • 1 teaspoon pure vanilla extract
  • 3/4 cup chocolate chips (I used a mix of semi sweet and milk) and added some almonds and walnuts 
1. Preheat oven to 350F or 180C 
2. Best butter and sugar on high until creamy, about 2 minutes. Then mix in eggs, one at time on medium speed; then yogurt, bananas, vanilla until mixed
3. On low, mix in dry ingredients. Sally’s recipe whisks dry beforehand but I just added one by one with flour last so it’s just one bowl. Don’t overmix 
4. Scrape sides down and mix in chocolate chips and/or nuts with spatula. I mix in 2 kinds of chocolate chips and then add nuts only to half of the side so there’s options. 
5. Bake for 60-65 minutes in loaf pan or 30-40 minutes in a square cake pan until top is browned and center is set. If you bake in loaf pan, cover the top halfway so it doesn’t burn. 
6. I can never wait for it to cool one hour. I cut it right away and try it and there’s nothing like eating it hot out of the oven! 😆 Store in fridge after 2 days, if it’s not all eaten by then. 

Enjoy! 


Wednesday, March 02, 2022

my kitchen: EASY LEMON KALE FAGOLI


Lemon kale bean soup just sounded so good and perfect for winter, and of course, halfbakedharvest takes the best photos, so I had to try this recipe. (I wish my kitchen had the window light that hers does, but sadly no windows in my kitchen). 

LEMON KALE ORZO SOUP

▢ 1 tablespoon extra virgin olive oil
▢ 1 shallot, chopped (x) 
▢ 4-6 cloves garlic, smashed
▢ red pepper flakes (x)
▢ 2 tablespoons salted butter
▢ 2 cups dry orzo pasta (i used fagoli, 1 cup next time, soaks too much liquid) 
▢ 6 cups low sodium chicken or vegetable broth
▢ 1 can white beans 
▢ kosher salt and black pepper
▢ 1/2 bunch kale, finely shredded
▢ 1/2 cup basil pesto (I added less) 
▢ 1/2 cup whole milk (I added a little heavy cream) 
▢ 1 cup grated parmesan cheese (I added 1/2 cup) 
▢ zest and juice of 1 lemon (I did 1/2 lemon)

https://www.halfbakedharvest.com/white-bean-lemon-pesto-orzo-soup/

Yum would make this again though I would add less starch so it’s more soupy than not

Monday, January 03, 2022

my kitchen: EASY MOCHI WAFFLES

Easy Mochi Waffles

Makes 4-6 waffles


I love waffles, but I had never made mochi waffles before. New year, new you, right? 

I had some sweet rice flour in the pantry from a visit last year to Siang Khau Lu, so I decided to give this recipe a try (it had the most reviews on google with 442). The result was a chewy, soft waffle that was like some of the round mochi breads or cheese breads I'd pick up at local bakeries. I wished it was slightly crispier on the edges, like this mochi waffle street vendor that I found in Taipei years ago before it was a thing. I should mention I didn't have any white sugar on hand, so I used brown sugar instead of white sugar, which did give it a caramel color and flavor, but did not make it crispy. I'll keep tinkering with this recipe and see if I can adjust it to be crispier. 

EASY MOCHI WAFFLES

Ingredients (makes 4-6 waffles) 

  • 3/4 cups milk
  • 1 egg
  • 1/2 teaspoon vanilla extract 
  • 1 1/4 cup mochiko flour
  • 1/4 cup sugar
  • 1 1/2 teaspoon baking powder
  • 1/4 teaspoon salt

1. Preheat waffle iron.

2. In a medium mixing bowl add 3/4 cup milk, 1 egg, and 1/2 teaspoon vanilla extract. Whisk until well combined.

3. Add 1 1/4 cup sweet glutinous rice flour, 1/4 cup sugar, 1 1/2 teaspoon baking powder, and 1/4 teaspoon salt. Whisk until just combined.

4. Add 1/4 to 1/2 a cup of the batter to the waffle iron. This will puff up a lot, so I recommend filling it less than half full to prevent overflow and make sure the edges get griddled. Cook for 3-5 minutes or until golden brown.

Friday, October 01, 2021

my kitchen: EASY HOMEMADE SOFT BAKED PRETZELS


Hi guys! I've been on a baking roll lately, looking for easy recipes and posting my favorite ones here for the next time. If you're impatient like me, we don't have the time to wait around for pretzels to rise for overnight or even a few hours. You want to be able to bake it, make it and eat it. I wanted to pick the least intimidating recipe for my first time making pretzels and I can attest that this pretzel recipe from Sally's Baking Addiction was spot on! Check out her video to see how she twists and turns the pretzel if it's your first time making pretzels. 

And the best part, the pretzel recipe only needs 10 minutes to rest!

I used to be really afraid of the step where you have to boil the pretzel in boiling water, but actually it wasn't that bad at all. The pretzels are at a size where they are manageable to take in and out and you can drop the heat so the water is hot but not boiling like crazy. Try this recipe!! There's nothing like fresh baked pretzels!!!! 

PS if you don't want to make pretzels, Auntie Anne's is finally in Taipei. and there's a place called TuuGuud in Tianmu that I've been meaning to try. Those are the main two places I can think of right now that have soft baked pretzels in Taipei, especially since the time I had one was at Beer and Cheese which closed years ago. They had good pretzels. 


EASY HOMEMADE SOFT BAKED PRETZELS
(thanks Sally's Baking Addiction) 

INGREDIENTS

PRETZELS 
- 1.5 cups (360ml) warm water (lukewarm– no need to take temperature but around 100°F (38°C) is great)
- 2 and 1/4 teaspoons (7ginstant or active dry yeast (NOTE: My instant yeast packets that I bought in Taipei were 3g each, I just used 2 packets for 6g and the pretzels turned out ok)
1 teaspoon salt
1 Tablespoon brown sugar or granulated sugar
1 Tablespoon unsalted butter, melted and slightly cool
- 3 and 3/4-4 cups (469-500g) all-purpose flour (spoon & leveled), plus more for hands and work surface
coarse salt or coarse sea salt for sprinkling

BAKING SODA BATH
1/2 cup (120g) baking soda
9 cups (2,160ml) water

1. Whisk the yeast into warm water. Allow to sit for 1 minute. Whisk in 1 teaspoon salt,  1 Tablespoon brown sugar, and 1 Tablespoon melted butter. 

2. Slowly add 3 cups of flour, 1 cup at a time. Mix with a wooden spoon (or dough hook attached to stand mixer) until dough is thick. Add 3/4 cup more flour until the dough is no longer sticky. If it is still sticky, add 1/4 – 1/2 cup more, as needed. Poke the dough with your finger – if it bounces back, it is ready to knead.

3. Turn the dough out onto a floured surface. Knead the dough for 3 minutes and shape into a ball. Cover lightly with a towel and allow to rest for 10 minutes. (Meanwhile, prep the water + baking soda boiling as instructed in step 6.)


4. Preheat oven to 400°F (200°C). Line 2 baking sheets with parchment paper or silicone baking mats. Silicone baking mats are highly recommended over parchment paper. If using parchment paper, lightly spray with nonstick spray or grease with butter. Set aside. (NOTE: So I didn't line my cookie tray with parchment paper and the baking soda water discolored it. So I recommend still lining your baking tray with something)

5. With a sharp knife, cut dough into 12-16 slices. I recommend cutting in 4 pieces, then cutting each quarter into thirds or four. If you want bigger mall sized pretzels, then cut into thirds and roll the dough into 20-22 inch long ropes.


6. Take one slice and roll the dough into a long rope on a floured surface. The longer it is, the thinner it will be. I went for shorter, thicker pretzels. 

7. Take one end of the rope and cross it with the other end and twist the ends once, then lift the twisted side to cross the rounded side and press down for the pretzel shape. Don't worry if it's not perfect, it will look fine after it's baked. 


7. Bring baking soda and 9 cups of water to a boil in a large pot. Drop 1-2 pretzels into the boiling water for 20-30 seconds. Any more than that and your pretzels will have a metallic taste. Using a slotted spatula, lift the pretzel out of the water and allow as much of the excess water to drip off. Place pretzel onto prepared baking sheet.


8. Sprinkle each with coarse sea salt. (NOTE: I didn't have coarse sea salt. so I used some flaky salt I had on hand. Where to find coarse salt in Taipei????) Repeat with remaining pretzels. 


9. Bake for 12-15 minutes or until golden brown. Congrats! You just made pretzels!! Enjoy one (or three) warm, even better with with cheese sauce or cinnamon sugar butter. 


Cinnamon Sugar Pretzels: Skip the coarse salt topping. Bake as directed in step 7. Meanwhile, melt 4 Tablespoons (60g) of butter. Brush the baked and warm pretzels with melted butter then dip the tops into a mix of cinnamon and sugar. Start with 3/4 cup (150g) of granulated sugar and 1 and 1/2 teaspoons cinnamon. Cinnamon sugar pretzels are best served that day because due to the melted butter topping, they become soggy after a few hours.

:)